


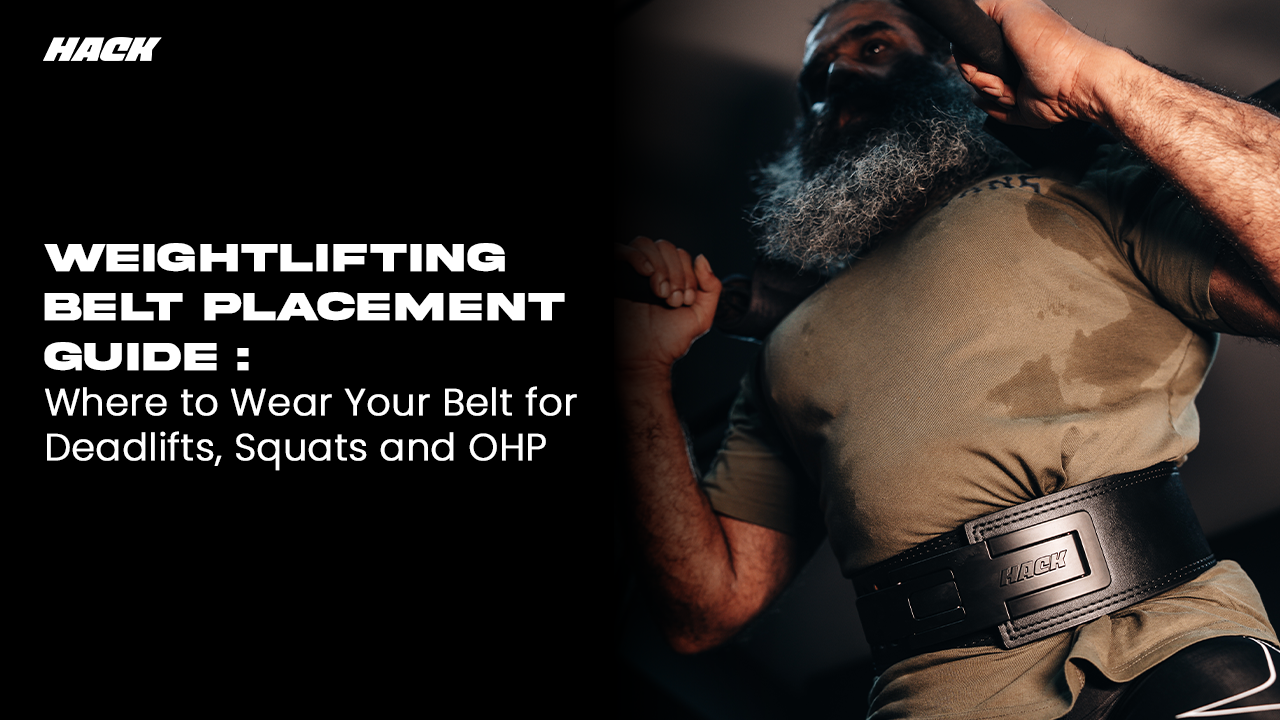
- The correct belt position is below the rib cage and above the hip bones, over soft tissue only
- Belt placement is essentially the same for squats, deadlifts, and overhead press
- A belt too low will dig into hip crests; a belt too high will restrict rib cage expansion during breathing
- The lever or buckle should sit at the front centre of the abdomen
- Tighten the belt to allow two fingers underneath when relaxed, firmly engaged when bracing
- Reserve belt use for working sets above 80 percent intensity for best long-term results
- 1. The Anatomy of Correct Belt Placement
- 2. How Belt Position Affects Intra-Abdominal Pressure
- 3. Belt Placement for the Squat
- 4. Belt Placement for the Deadlift
- 5. Belt Placement for the Overhead Press
- 6. Placement Comparison Across the Three Main Lifts
- 7. Common Belt Placement Mistakes
- 8. How Belt Type Affects Placement Precision
- 9. Expert Tips on Placement From Competitive Lifters
- 10. Who Benefits Most From Correct Placement
- 11. Related Reading
- 12. Frequently Asked Questions
Buying the right weightlifting belt is only half the equation. Where you position it on your torso determines whether it functions as a genuine performance tool or becomes an expensive piece of nylon or leather that does little more than look the part. A belt worn in the wrong position provides almost none of the intra-abdominal pressure benefits it is designed to create. In the worst case, an incorrectly positioned belt can cause discomfort at the ribs or hips that degrades your movement pattern under load. This guide explains exactly where to wear your weightlifting belt for each of the major barbell lifts, and why that position matters from a biomechanical standpoint.
The Hack Athletics team has tested belt placement across thousands of training sessions with athletes ranging from beginners to national-level competitors. Every belt in the range is designed at a uniform 4-inch width so it can sit in the correct anatomical zone without requiring individual adjustment of the belt width for different lifts.
Last reviewed: April 2026
1. The Anatomy of Correct Belt Placement
The correct placement zone for a weightlifting belt is determined by the bony landmarks of the torso. The lower edge of the rib cage (the floating ribs and the costal margin) forms the upper boundary. The iliac crests of the pelvis (the bony protrusions you can feel at the top of the hip bones on each side) form the lower boundary. Between these two landmarks is a zone of soft tissue including the abdominal muscles, the obliques, and the lumbar back muscles at the sides and rear.
The belt should sit entirely within this soft tissue zone, with no part of the belt resting on bone. When the belt is correctly positioned and you brace your core and inhale, your abdominal wall expands outward and presses against the inside of the belt. This is the mechanism through which the belt creates intra-abdominal pressure. If the belt is sitting on the hip crests or lower ribs, the belt is pressing against bone rather than soft tissue, and the expansion mechanism cannot work effectively.
Anatomical reference: For most adults, the correct belt zone spans approximately 10 to 15 cm of vertical torso height. This is why Hack Athletics belts are designed at a 4-inch (approximately 10 cm) width: they fill the available soft tissue zone without overrunning onto the bony landmarks above or below.
2. How Belt Position Affects Intra-Abdominal Pressure
Intra-abdominal pressure (IAP) is the primary mechanism through which a lifting belt enhances performance. When the abdominal cavity is pressurised, it acts as a rigid cylinder that helps transfer force from the lower to upper body during compound lifts. The foundational research on IAP and belt use published in the Journal of Applied Physiology showed that a correctly positioned belt increased IAP by 15 to 40 percent, reducing the compressive load on spinal discs during heavy lifts.
For the belt to generate IAP effectively, it needs to provide a rigid surface for the abdominal wall to push against during the Valsalva maneuver or a controlled diaphragmatic brace. If the belt is positioned too high, the rib cage restricts the lateral expansion needed for the brace. If the belt is too low, the hip bones prevent the belt from being tightened enough for the abdominal wall to press against it meaningfully.
Correct belt position and correct bracing technique work together. Even a perfectly positioned belt will not generate useful IAP if the lifter is not actively bracing against it. Learning both skills simultaneously produces the best results.
3. Belt Placement for the Squat
The Starting Position
For the squat, position the belt with its centre (where the lever or buckle sits) directly over your navel. The top edge of the belt should clear the bottom of your lowest visible rib by approximately one finger width. The bottom edge should clear the top of your hip crests by a similar margin. Fasten the belt snugly and take a test breath: you should feel your stomach expand forward and press firmly into the belt without the belt pinching anywhere.
What Happens at the Bottom of the Squat
As you descend into the squat, your trunk slightly inclines forward and your hip crests rotate toward your lower ribs. For deep squatters, there is some compression of the space between the rib cage and pelvis. A belt that is correctly positioned will remain in the soft tissue zone throughout this range of motion. A belt positioned too low at the starting position can get trapped between the hip crests and lowest ribs at the bottom, causing pain and disrupting the lift.
A common observation among competitive powerlifters is that the belt seems to rise slightly as they approach the bottom of the squat. This is an optical illusion caused by the trunk tilting forward: the belt stays in the same anatomical position relative to the soft tissue, while the visual reference points of the rib cage and hips rotate toward each other. The belt does not need to be repositioned between reps.
Put the belt on and perform an unloaded squat descent before adding weight. Check that the belt does not dig into the hip crests at the bottom of your range of motion. If it does, raise the belt by 2 to 3 cm and test again before loading the bar.
4. Belt Placement for the Deadlift
The Core Placement Principle
For the deadlift, the belt placement zone is identical to the squat: below the ribs, above the hips, over soft tissue. However, a practical consideration specific to deadlifting is the position of the thighs at the setup. When you hinge at the hip and reach down to the bar, the top of your thighs moves upward toward your lower abdomen. If the belt's lower edge is positioned too low, it can press against the top of the thigh as you set up over the bar, which creates discomfort and can actually push you into a less optimal starting position.
Belt Height Adjustment for Deadlifts
Many experienced deadlifters position the belt 1 to 2 cm higher for deadlifts than for squats specifically to avoid the thigh-belt contact issue. This small upward shift keeps the belt within the soft tissue zone while creating clearance for the hip hinge at setup. The top edge of the belt should still clear the ribs; the net effect is a slightly more rib-proximal position compared to the squat setup.
Research from the National Center for Biotechnology Information on powerlifting belt use and spinal mechanics notes that intra-abdominal pressure during deadlifts peaks in the initial pull phase, when the lumbar spine is under the greatest shear load. Correct belt position during the setup and initial pull is therefore critical, and any positioning that disrupts the setup position should be corrected before adding maximum loads.
Deadlift-specific note: Sumo deadlifters with a very wide stance sometimes experience belt-thigh contact issues that conventional deadlifters do not. If you pull sumo and experience this problem, experimenting with 2 to 3 cm higher belt placement often resolves it without compromising bracing effectiveness.
Built for Every Lift You Train
Competition-specification leather and nylon belts, designed at a uniform 4-inch width for consistent placement across squats, deadlifts, and overhead pressing.
Shop Weightlifting Belts5. Belt Placement for the Overhead Press
Why the OHP Needs a Belt
The standing overhead press requires the lumbar spine to resist significant hyperextension forces as the bar moves overhead. Without core bracing support, lifters commonly compensate by excessively arching the lower back, particularly under heavy loads. A belt helps resist this tendency by providing a rigid surface to brace against, cueing the lifter to maintain a neutral or slightly tucked pelvic position throughout the press.
Placement for OHP
Belt placement for the overhead press follows the same anatomical rules: below the ribs, above the hips. The one nuance with OHP is that the slight natural forward lean of the torso as the bar passes the face changes the pressure distribution against the belt. Some lifters find they prefer the belt set 1 cm looser for OHP compared to squats and deadlifts to allow for this slight postural shift. The NSCA's resources on overhead pressing mechanics note that excessive lumbar hyperextension during OHP is one of the most common technical faults and a significant contributor to lower back strain in training.
6. Placement Comparison Across the Three Main Lifts
| Lift | Belt Zone | Key Adjustment vs Squat | Common Error |
|---|---|---|---|
| Squat | Below ribs, above hips, centred on navel | Baseline position | Too low, causing hip-crest contact at the bottom |
| Deadlift | Below ribs, above hips, slightly higher than squat | 1-2 cm higher to clear thigh at setup | Too low, creating thigh-belt interference during hip hinge |
| Overhead Press | Below ribs, above hips, same as squat | Slightly looser tension optional | Too high, restricting rib expansion during the press lockout |
| Bench Press | Not typically used | Belt not needed for horizontal pressing | Using a belt that limits leg drive setup position |
7. Common Belt Placement Mistakes
Belt Too Low: The Hip Dig Problem
Wearing the belt so its lower edge rests on or crosses the iliac crests is the most common placement error. The hard belt edge pressing against the bony hip protrusion creates sharp pain at the bottom of a squat or during the hip hinge setup for a deadlift. Beyond the discomfort, the low position also means the top of the belt is sitting across the belly button or lower, leaving the lower back without belt coverage at the rear. Fix: raise the belt until the lower edge sits clearly above the top of the hip crests.
Belt Too High: The Rib Restriction Problem
When the belt is positioned too high, its upper edge presses against the lowest ribs. This makes it physically uncomfortable to take a full breath, because rib expansion is restricted. Lifters in this position often compensate by taking shallower chest breaths rather than diaphragmatic belly breaths, which produces far less IAP. Fix: lower the belt until the upper edge sits one finger width below the lowest palpable rib.
Belt Rotated to One Side
Some lifters rotate the belt so the lever or buckle sits off-centre, to avoid the buckle pressing on the navel. While this may seem like a minor comfort adjustment, it creates asymmetric pressure around the torso: one side of the mid-section has more belt coverage than the other. Over time, this asymmetric bracing can reinforce muscular imbalances. If buckle-on-navel discomfort is an issue, adjusting belt tightness or selecting a different buckle style is preferable to rotating the belt.
Not Bracing Into the Belt
Correct placement is necessary but not sufficient. A belt worn in the perfect position but not actively braced against generates no meaningful IAP. Before every working set, take a full diaphragmatic breath, expanding your belly outward and pressing it into the front of the belt, then brace your entire mid-section 360 degrees against the belt on all sides before initiating the lift. The belt should feel like it becomes a rigid cylinder you are pushing against from the inside.
Do not hold your breath for extended periods under load without the intention to use the Valsalva correctly. Learn proper bracing and release technique before training at maximum intensities with a belt.
8. How Belt Type Affects Placement Precision
Different belt constructions have different margins for placement error. A flexible nylon quick-lock belt can conform somewhat to an imperfect position because the material bends against the body. A stiff 13mm lever belt is completely rigid and will not conform at all, so any misplacement is immediately felt and impairs performance.
The practical implication is that lifters using stiffer, thicker belts need to be more precise about placement than those using flexible nylon options. Athletes who have trained with the Hack Athletics nylon quick-lock belt before upgrading to the 13mm lever belt often report that the leather belt requires more deliberate positioning practice to get right, even though the anatomical target zone is identical.
The IPF technical rules that govern competition belt specifications (maximum 10 cm width, maximum 13mm thickness) are designed precisely so that compliant belts fit within the natural soft tissue zone of the human torso. This is why buying a belt built to these specifications, as all Hack Athletics weightlifting belts are, results in a product that physically fits the correct anatomical position.
9. Expert Tips on Placement From Competitive Lifters
After extended use, experienced powerlifters often develop highly specific placement habits that are worth understanding.
Many competitive lifters mark the ideal belt position on the belt itself, using a permanent marker to indicate the correct rear and side alignment. This allows them to position the belt consistently without a mirror or assistance, even during competition warm-ups in busy warm-up rooms. A small mark on the inside of the belt at the midpoint of the back panel, aligned with the lumbar spine, is a simple reference that speeds up setup time significantly.
Competition observation: In practice, elite lifters spend less than ten seconds positioning their belt before working sets. This comes from thousands of repetitions with the same belt in the same position. Developing this muscle memory through consistent practice at training weights is what makes belt use seamless under competition conditions.
Research covered in the Journal of Strength and Conditioning Research on belt use and spinal kinematics indicates that experienced belt users show significantly less spinal flexion and extension variability across repetitions than novice belt users, suggesting that belt placement consistency is a trainable skill with direct performance implications.
Some lifters also adjust belt tightness between the squat and deadlift during a competition, going one click tighter on the lever for squats (where the torso is more upright and bracing duration is longer) and slightly looser for deadlifts (where the hip hinge requires a small amount of belt flex during setup). This fine-tuning is only possible with lever belts that have been properly fitted and is a refinement for intermediate to advanced athletes rather than something beginners need to concern themselves with.
10. Who Benefits Most From Correct Placement
- Learning correct placement from the first belt session prevents bad habits that are difficult to unlearn
- Start with the Quick-Lock Nylon Belt for the widest adjustment range while developing placement consistency
- Practice placement with an empty bar before progressing to loaded sets
- Correct placement becomes more important as loads increase and the margin for belt-assisted error decreases
- The 10mm Lever Belt is ideal for this stage, providing competition-grade rigidity with lever convenience
- Experiment with lift-specific placement variations (deadlift vs squat) at this stage
- Placement consistency across the warm-up room and competition platform is a critical skill
- The 13mm Lever Belt (4-Claw) meets IPF specifications and requires precise placement for maximum performance
- Develop a pre-lift belt-check routine and practice it in training to replicate it under competition pressure
- The correct belt position is below the rib cage and above the hip bones, always over soft tissue only
- Placement for squats, deadlifts, and overhead press is anatomically the same, with minor lift-specific fine-tuning
- Deadlifters often position 1 to 2 cm higher than squatters to avoid thigh-belt contact at setup
- A belt too low digs into hip crests; a belt too high restricts the diaphragmatic breathing needed for proper bracing
- Stiffer, thicker belts (13mm ) require more placement precision than flexible nylon options
- Correct placement is a trainable skill that becomes automatic after hundreds of repetitions with the same belt
- Reserve the belt for working sets above approximately 80 percent intensity; train core strength unbelted on lighter sets
11. Related Reading
12. Frequently Asked Questions
Where exactly should a weightlifting belt sit on your body?
A weightlifting belt should sit directly below the rib cage and above the hip bones. The optimal position is with the top edge of the belt just clearing the lowest rib, and the bottom edge clearing the top of the hip crests. This places the belt over the soft tissue of the mid-section where the abdominal wall can press outward against it during inhalation.
Should the belt position be different for squats versus deadlifts?
The anatomical position of the belt itself does not change between squats and deadlifts. Both lifts benefit from the belt sitting below the ribs and above the hips. However, some lifters prefer to position the belt slightly higher for deadlifts to avoid the top edge catching on the thighs at lockout. This is a minor adjustment based on individual body proportions rather than a fundamentally different placement strategy.
Can I wear a belt for the overhead press?
Yes. A belt is useful for standing overhead press because it helps stabilise the lumbar spine against hyperextension, a common fault under heavy load. The placement is identical to squats and deadlifts: below the ribs and above the hips. Some lifters wear the belt slightly looser for OHP to allow the slight forward lean that naturally occurs as the bar passes the face.
Why does my belt dig into my hips when I squat?
If the belt digs into your hip crests at the bottom of a squat, the belt is positioned too low. Raise the belt so its lower edge clears the top of the hip bones entirely. The belt should sit in the soft tissue zone between the lowest rib and the hip crest, not across the bony structures themselves.
Should the belt buckle be at the front or can it be off-centre?
For lever belts and prong belts, the buckle or lever sits at the front centre of the abdomen by design. This is the correct position. Some athletes rotate the belt slightly so the lever is off-centre to avoid discomfort at the navel, but this can affect how evenly the belt applies pressure around the mid-section and is generally not recommended.
How tight should the belt be for each lift?
Most lifters use the same tightness for all lifts: snug enough that two fingers slide under the belt when relaxed, but tight enough to feel firmly engaged when bracing. Some athletes prefer a slightly looser setting for deadlifts to allow hip hinge freedom, and tighter for squats where the torso is more upright and intra-abdominal pressure demands are higher.
Does belt placement matter differently for thicker belts like 13mm vs thinner belts?
The anatomical placement zone is identical regardless of belt thickness. However, thicker and stiffer belts like 13mm models feel more intrusive on the ribs and hips if they are even slightly mispositioned. This is why lifters using 13mm competition belts are generally more precise about placement than those using thinner or more flexible belts.
Should I put my belt on before warming up or only for working sets?
Most coaches and experienced lifters recommend using the belt only for working sets above approximately 80 percent of your one-rep max, and leaving it off for warm-up sets. Training without a belt on lighter sets helps develop the core strength and bracing mechanics that make the belt most effective when you do put it on. Using a belt for every set from the warm-up onwards can reduce the development of raw core stability over time.
How high should a weightlifting belt sit on your torso?
The belt should sit in the soft tissue zone directly below your rib cage and above your hip crest. When bracing, your abdominal wall should press outward against the belt on all sides — front, sides, and lower back. Most lifters find the optimal position is 1–2 cm below the lowest rib.
Does belt position change between squats and deadlifts?
Many experienced deadlifters position the belt 1–2cm higher for deadlifts than for squats to create clearance between the belt's lower edge and the thighs during the hip hinge setup. The top edge should still clear the ribs. Sumo deadlifters with a very wide stance may need to experiment with 2–3cm higher placement to avoid belt-thigh contact.
Do you wear a weightlifting belt for the overhead press?
Yes. A belt is beneficial for the standing overhead press as it provides a rigid surface to brace the core against, resisting excessive lumbar hyperextension under heavy loads. Belt placement for the overhead press follows the same rules as squats — below the ribs, above the hips, tight enough to brace against during the Valsalva maneuver.
What is the correct breathing technique when wearing a lifting belt?
Before initiating each rep, take a full diaphragmatic breath (360-degree expansion — front, sides, and back), then brace your core against the belt as if you were about to take a punch. This creates maximum intra-abdominal pressure. Hold this brace throughout the movement and exhale only at the top of the rep.
Does research support the effectiveness of weightlifting belts?
Yes. Research published in the Journal of Applied Physiology found that a correctly positioned belt increased intra-abdominal pressure (IAP) by 15–40%, reducing compressive load on spinal discs during heavy lifts. The effectiveness depends entirely on correct belt position and proper bracing technique — a mispositioned belt provides significantly less benefit.
Can belt position shift during a squat?
The belt position should not shift during a squat if it is correctly fastened. Many lifters observe the belt appearing to 'rise' as they descend — this is an optical illusion caused by the trunk tilting forward, not actual belt movement. The belt remains in the same anatomical position relative to the soft tissue throughout the lift.
Does belt position change for sumo deadlifts?
Sumo deadlifters often experience belt-thigh contact due to the wide stance and lateral hip hinge. Positioning the belt 2–3cm higher than the standard squat position usually resolves this without compromising bracing effectiveness. Experimenting with position during warm-up sets — not during maximal attempts — is recommended.
